I've recently started featuring my professional and commercial work on Flickr, the fastest-growing photo sharing site in the world. Several of my friends who have seen the recent uploads have commented that some of the photos there don't look like photos, but rather paintings or computer-generated scenes. Invariably, though, I get complimented on the images with comments like "it looks like a postcard" or "it looks like the travel bureau's painting" etc. While I truly and sincerely appreciate the flattering remarks (despite the unbelief that the photos are, well, photos), I can assure everyone that these images are indeed photographs.
Let me walk you through the creation of one of my latest photographs. Yes, I will admit that they have been manipulated somewhat, but only to the extent that they are HDR (high dynamic range)images, and as such sometimes have that characteristic surreal or even "hyper-real" look to them. Very little else is done to the photo except for color correction or in the case of the example discussed here, to replace a dull, lifeless sky (which unfortunately shows off dark spots from a then-dirty camera sensor) with a more active sky. The process of creating an HDR image and the subsequent tone mapping might seem like a ton of manipulation, but in reality all the process does is to enhance and expand on detail already present in the native camera image file. The HDR process brings out a lot of hidden latitude in tonal and exposure values otherwise lost in a single exposure image. The process sometimes, by it's very nature of enhancing detail, brings out some flaws or blemishes in the image which would also get lost in a regular exposure. The obvious remedy is to edit these errors out in the process as well. This is really the extent of the manipulation of the image. As you can see, though, the software used to create the final image (and all intermediate images) sometimes creates a very "painterly" image which is a bit too idealized and therefore, a little to hyper-real to the point of looking unreal. Finding the right balance between the post-processing effects and settings is the real key in realistically enhancing an image.
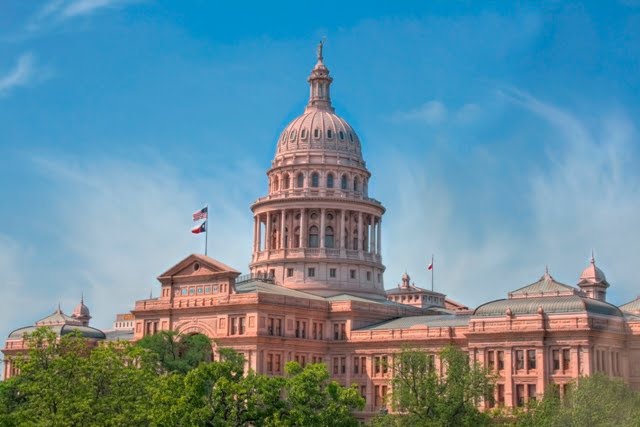
Let's start with looking at the original photo of the Texas State Capitol in Austin, TX.

I approached this setup and composition already knowing I wanted to create an HDR, which is sort of imperative, since the images have to be aligned and the camera be held perfectly steady. A tripod was essential for the shots, as well as a remote camera release to prevent any camera shake. The secret to the ultra-detailed, high dynamic range images is to capture all the range of detail in the scene. This makes it necessary to capture a series of images of different exposure values, exposing each frame for the brightest highlights (severely underexposing the rest of the image) to the darkest shadows (severely overexposing the rest of the image). I always opt to use three frames, though most other pros would argue that more is better, simply because my cameras have a setting for auto exposure bracketing which uses a three-frame burst. I usually bracket each separate frame to differ by about two stops over and under. You can see this in each of the three separate frames here, one underexposed (darker) by two stops and one overexposed (lighter) by two stops. The middle frame is the correct exposure and would normally be the final shot by itself.

My first step towards generating the final HDR image is to import the three frames into a program called Photomatix Pro. I usually play around with the settings to experiment with looks, but the two most widely used settings for me are the "Natural" setting and the "Grunge" setting. The Natural setting I usually use as a starting point, just maxing out the Strength setting and keeping the Microcontrast pretty high, Saturation at 1.0, and Microsmoothing at around 15. Here's the "Natural" preset with my modifications:

For architecture or images with a lot of detail contrast, the Grunge setting is perfect except that it makes the skies look really crappy unless there is some very active cloud cover. For this shot, with a clear blue plain sky, it just didn't look very good on the Grunge setting:

Notice, also, that in each of these images, there is a lot of noise, likely introduced during the tonemapping, and a huge reflection in the upper right quadrant since I shot this through a window. The first thing to do before continuing is to remove the reflection, and near the end, run a noise reduction filter.
I really like the way the building looked on the Grunge setting, but not the foliage or the sky. My solution was to combine the two looks by opening both images in Photoshop and importing the Grunge image into the more natural image as a new layer. The two could then be blended by erasing the top layer in areas where the bottom layer was to show through, in this case, the sky and foliage. I personally prefer to do this using a grayscale layer mask, as it affords more control than simply erasing the top layer. In this image, you can see how I've blended the building part of the Grunge layer with the sky and foliage part of the Natural layer.

The image is starting to really pop, but there is still one thing that is annoying me, and that's the dull, so-blue-it's-almost-gray sky. Since the backdrop of the sky here is pretty uniform in color, I just used the PhotoKey software to add in a different sky "background" to this image as if I was working with a blue screen.

It might seem a little like cheating, but hey, I'm not using this for photojournalism, so a little artistic license might be okay.

This is now pretty close to finished, and I actually like the way this looks, if I were going for an artsy, painted look. I want something that looks more realistic, but still really crisp and almost surreal. The biggest things that, to me, detract from making this image look more real and less manipulated is that the saturation is still to high. Simple solution: copy the background layer and desaturate the top layer, then use the opacity slider to drop the opacity to around 20%-30% so it just barely tames down the color.
.jpg)
This image is much better and not so "painted," but it still looks, well, somewhat fake. As you can tell now, though, it is definitely a real photograph, but I also want it to look like a real photograph and not a painting. The solution here was to go back and import the original, unprocessed photograph and blend it in as a semi-opaque layer to this image to give it the right amount of realism. What you see here, and this is the final image, is the highly processed HDR image blended with the original unprocessed image.
And that, my friends, is how I roll, and how one of my images typically gets made.

No comments:
Post a Comment